Check Out Items to Patrons
|
For training resources
|
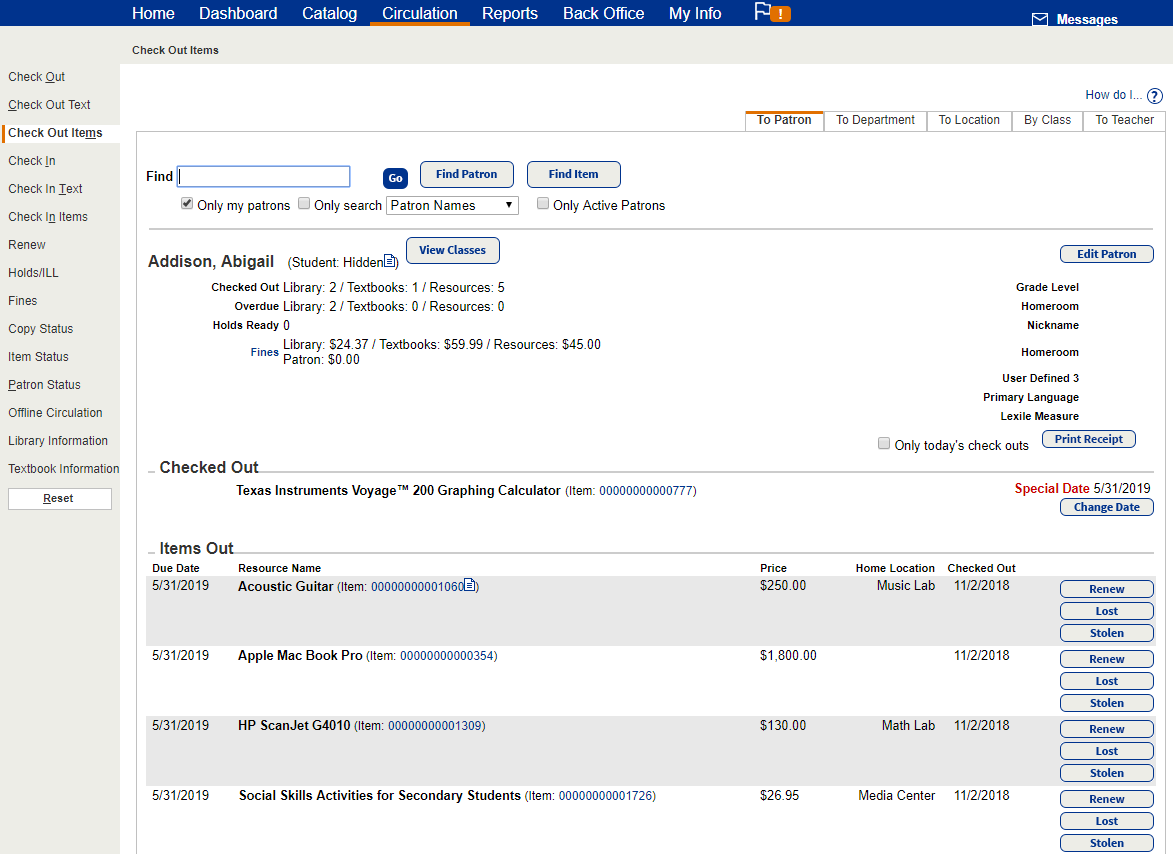
Destiny checks out items to patrons using the loan period defined in Admin > Resource Policies. The item then appears in the Checked Out section of the Checkout Items to Patrons page. When you check out another item to the same patron, the previous checkout moves to the Items Out section. Textbook resources include the title and ISBN.
Checkouts
Checkouts do the following:
- Honor the due date assigned in the "by class date range" loan period type.
- Allow textbooks that use the textbook template to be checked out for any of the existing Resource Manager loan period types.
- Select Circulation > Check Out Items > To Patrons sub-tab.

- In the Find field, scan the patron's barcode, and then click Find Patron.
- To complete the task for active patrons, select the Only Active Patrons checkbox.
Note: When checking out to an active patron, if a message about licensing appears, you do not have the correct site licensing according to your agreement.
- Use the following table to complete your task:
To check out… Then… Note:
When you check out, check in, or inventory a resource with components, a pop-up lets you adjust the component quantities, if needed.
A barcoded item
- In the Find field, scan the item barcode.
- Click Find Item.
- Find the item you want, and then click Check Out.
An unbarcoded or consumable* item
- In the Find field, type a keyword for the resource you want to check out.
- Click Find Item.
- Find the item you want, and then click Check Out.
Multiple unbarcoded items
- In the Find field, type a keyword for the resource you want to check out.
- Click Find Item.
- Next to the item you want, type a Quantity, and then click Check Out.
- A confirmation message shows the number of items to be checked out and the due date. Click Yes to confirm or click No to change the quantity.
* Note: To circulate unbarcoded and consumable items, your site must be configured correctly.
- Select Admin > Site Configuration > Circulation sub-tab.
- Make sure the following checkboxes are selected: Allow unbarcoded resources to be checked out and Allow consumable resources to be checked out.
You do not have to check in consumables at the end of the loan period. A nightly job deletes them automatically. You can check consumables in early; they are added back to the inventory with an Available status. See Patron Status.
Resource Container Checkouts
Resources with included items can be circulated to patrons, as well as renewed. The process is the same as checking out and renewing an individual item.
Checkout Restrictions
To view all transaction restrictions, see Resource Containers.
Checkout Transaction Blocking Conditions
See Resource Container Transaction Blocking Conditions.
|
Note: To permanently assign a resource to a patron, update the Custodian on record using either Update Resources or Edit Item in the Catalog. |
In-Hand Transfer
An in-hand transfer is when an item or container from another site in your district is scanned at your site, and then transferred to your site.
|
Notes:
|
Example: An item in your district is scanned at your site, but it is currently assigned to another site in the district.
- If in-hand transfers are allowed, the system displays an in-hand transfer message.

- If the item already has a status, such as checked out, selecting Yes to the in-hand transfer message resolves any previous statuses.
Change Due Date
To change the due date of the item under Checked Out:
- Click Change Date. The Due Date page appears.
- Change the Due Date. Special Date appears in front of the date.
To change the due date of any of the items listed under Items Out, you need to check them out again.
Mark Checked-Out Resources Lost
To mark a resource lost, click Lost next to the item. If you charge fines for lost items, use the next page to do so. If you opted to have fines automatically assessed, an alert message lets you accept the fine, or edit or waive the amount.
Renew Checked-Out Resources
|
Note: Checked-out resources can only be renewed if they have a loan policy interval that includes an associated calendar date or number of days. The Renew button only appears when the loan period changes the due date or has been updated. If the loan policy is Unlimited, the Renew button does not appear. To see it, check the item in and out again. |
- Renew from Checked Out Items:
- Select Circulation > Check Out Items.
- Enter a name in the Find field, then click Find Patron. The patron's information appears.
- Click Renew for an individual item. The item is renewed.